Getting started with AUI#
IDE#
- Recommended as "out of the box" crossplatform solution.
- Has free version for non-commercial development.
- No additional setup required.
- Install following extensions:
| Extension | Description |
|---|---|
| cpp tools pack | Introduces basic C/C++ support and CMake integration. |
| vscode-clangd | C++ language server for extensive code navigation, autocomplete, etc. |
- Add these lines to your
settings.json(F1> Preferences: Open User Settings (JSON)):
OS prerequirements#
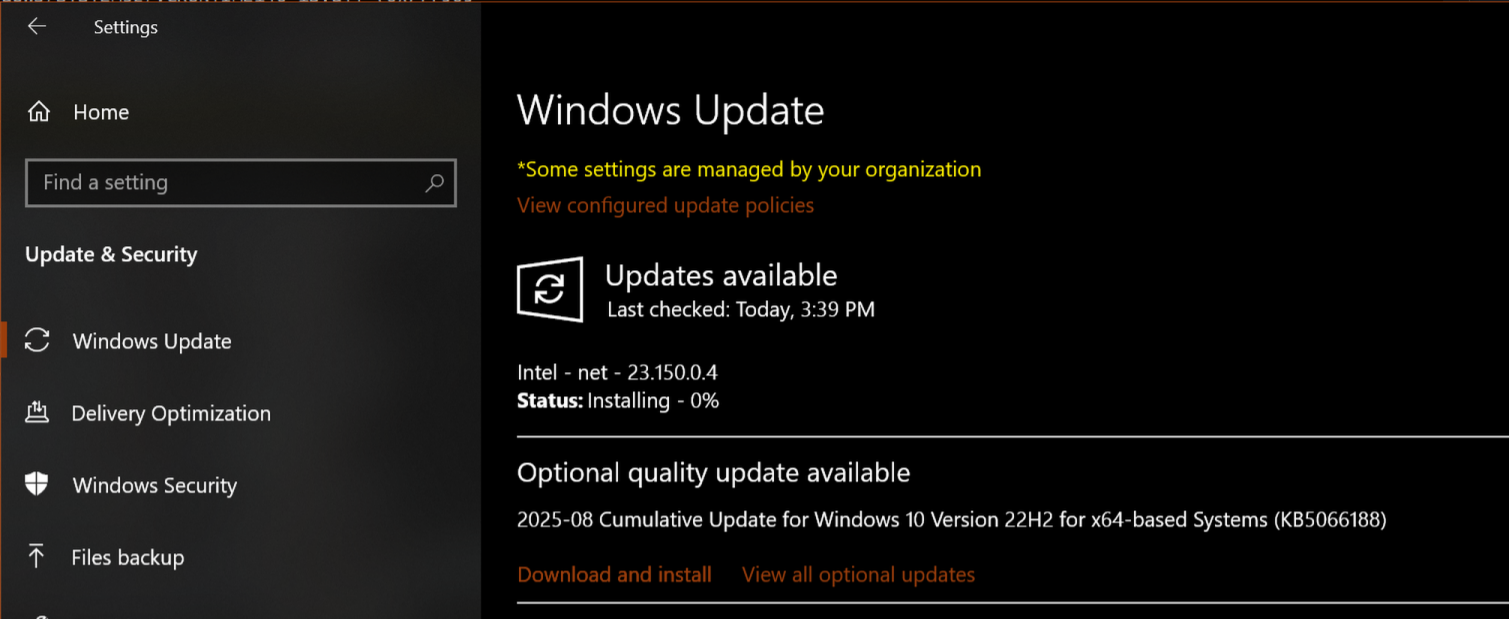
Install Windows updates
You may want to ignore this, but in case of errors, please ensure you have installed Windows updates.
Install MSVC compiler
CLion comes with MinGW by default. It works okayish, but we recommend using de-facto standard compiler for Windows instead.
VS Code does not come with any compiler by default.
You are not forced to use Visual Studio IDE, you can use whatever IDE you want. We just want the compiler part.
Visual Studio Community edition is sufficient.
Install msvc or clang, if you haven't already, and reboot.
Press Win, type Visual Studio Installer and launch.
Choose Individual components tab.
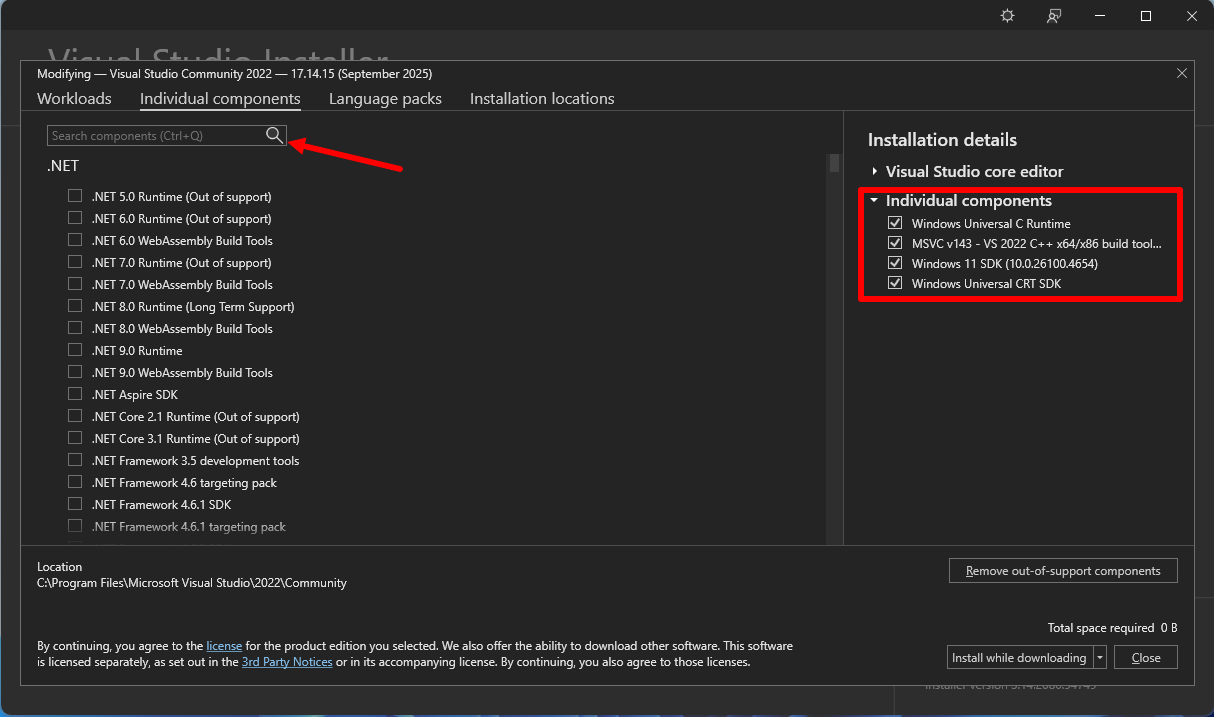
Search and select the following components:
Windows Universal C RuntimeMSVC v142or newerWindows 10 SDKor newerWindows Universal CRT SDK
Click Install.
Don't forget to reboot!
Configure CLion to use MSVC compiler instead of MinGW
While you can use MinGW for your AUI project, it is recommended to use commonly accepted compiler for Windows.
If you use VS Code, it will pick up the correct compiler automatically.
If you use CLion:
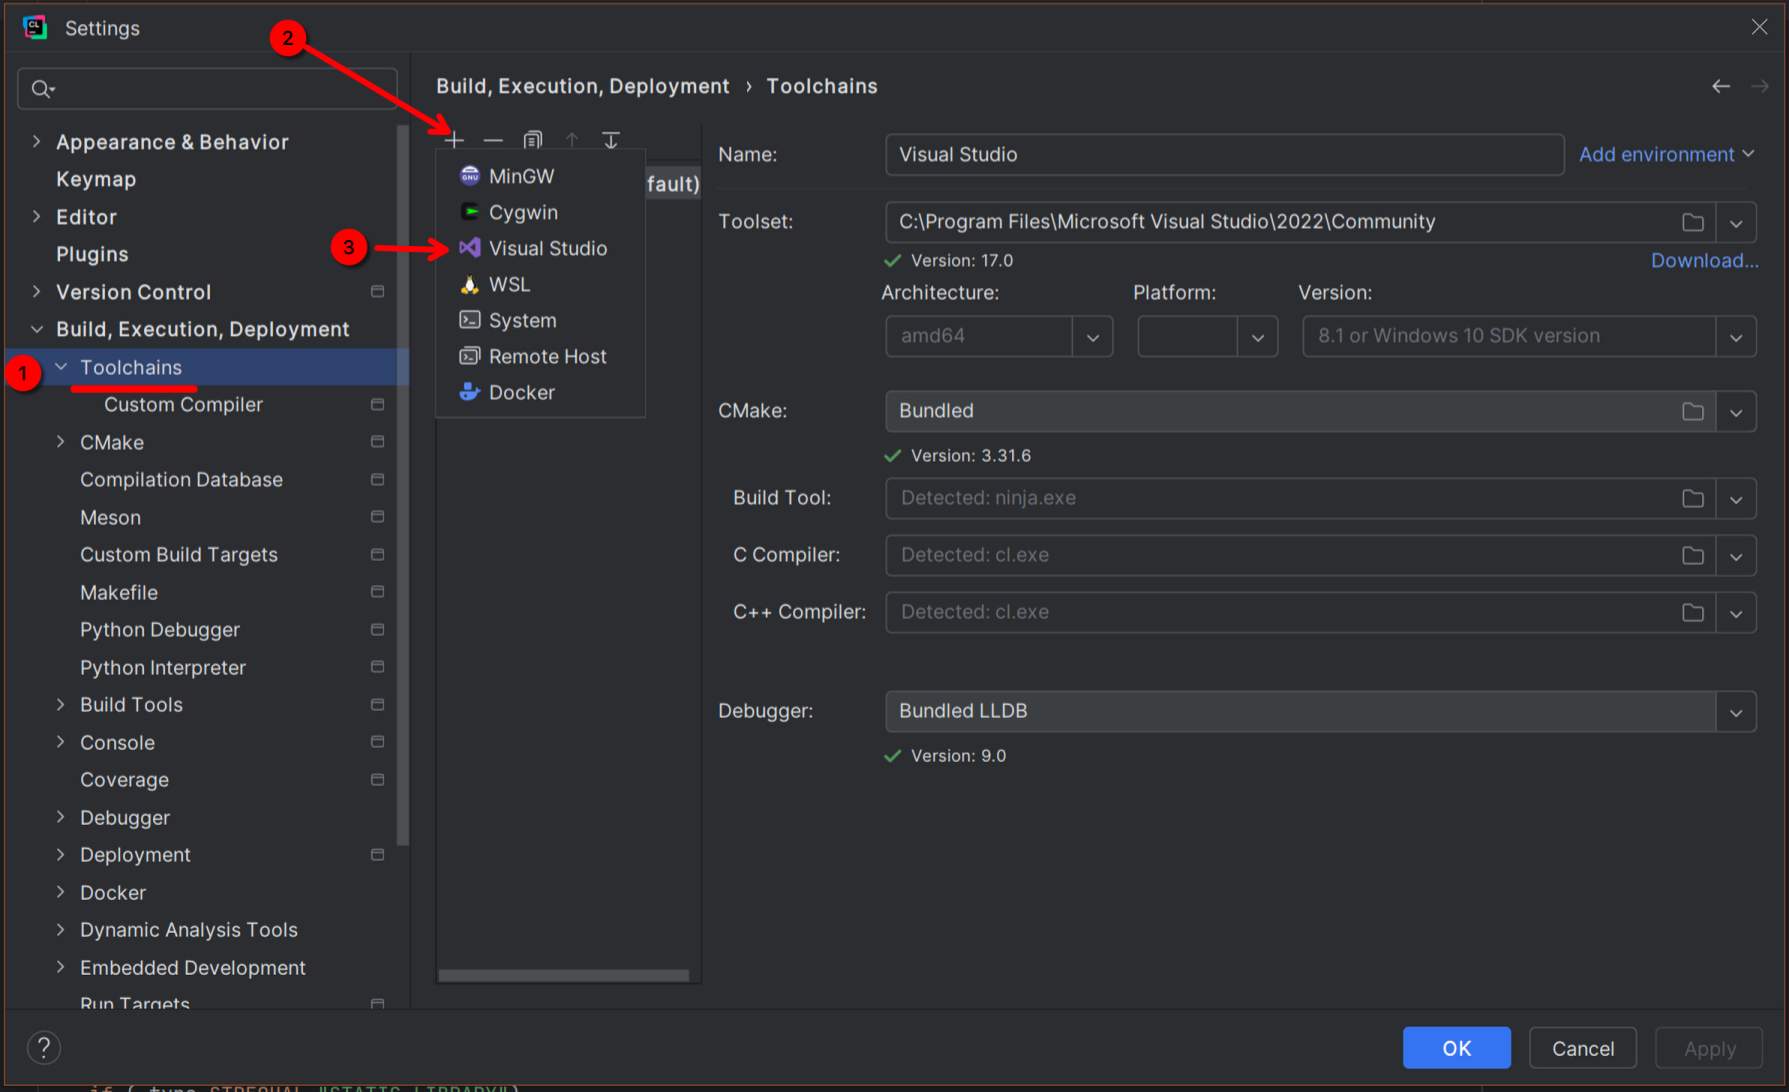
- Ctrl+Alt+S, navigate to "Build, Execution, Deployment" > "Toolchains".
- Press
+. - Choose Visual Studio. CLion should pick up it automatically.
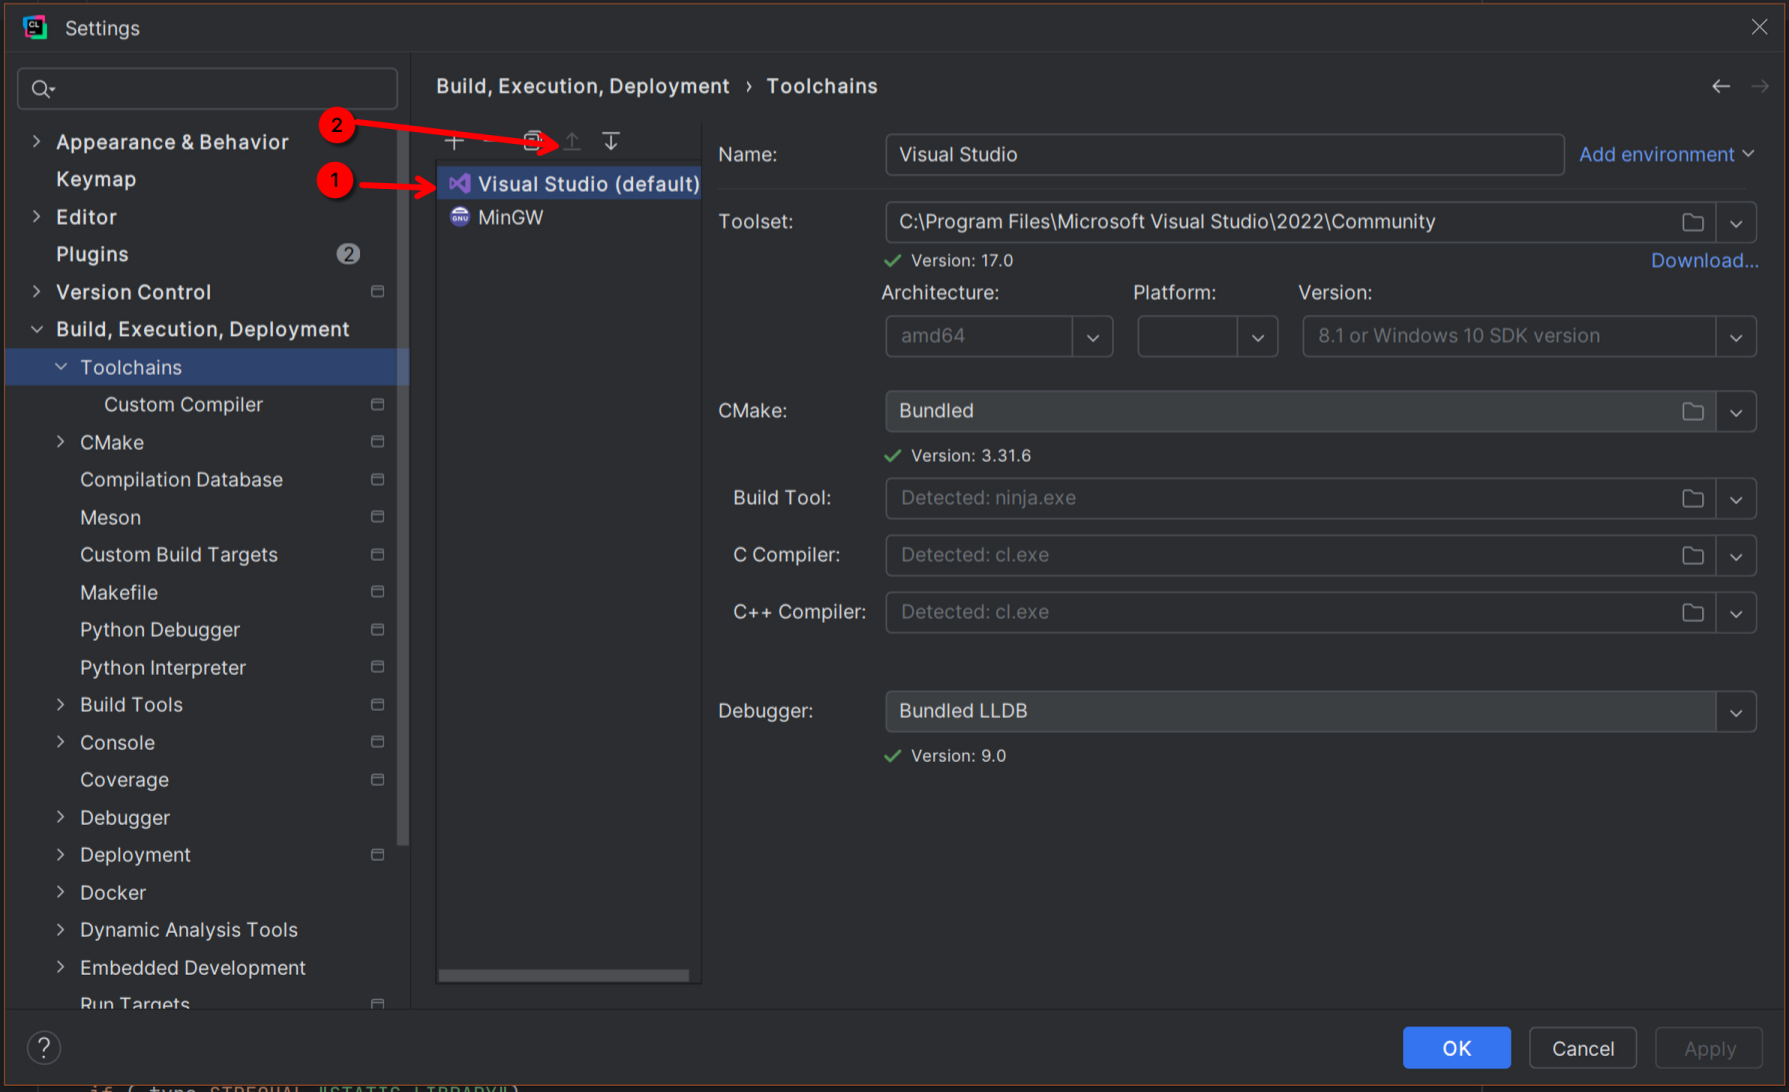
- Select Visual Studio.
- Press "arrow up" button to raise priority. Visual Studio compiler should be by default!
- Press OK.
Install Xcode.
Install following dependencies:
Installation#
AUI does not provide "traditional" installation methods that involve manual downloading and deploying; instead, package managers are used to ensure easily reproducible builds. They compile and link all required dependencies automatically to free you from dependency management and focus you right to development of your application.
You can use our App Template ⚡ to set up a new project quickly with AUI's .clang-format, Github Actions and other features out-of-the-box. The template is based on CMake and aui.boot.
Clone https://github.com/aui-framework/example_app with your IDE or via terminal:
git clone https://github.com/aui-framework/example_app
and open that directory in your IDE.
Recommended: Create a new repo
From App Template ⚡ repository, you can generate a completely separate repo with clean git history:
- Open http://github.com/aui-framework/example_app
- Click
Create a new repository.
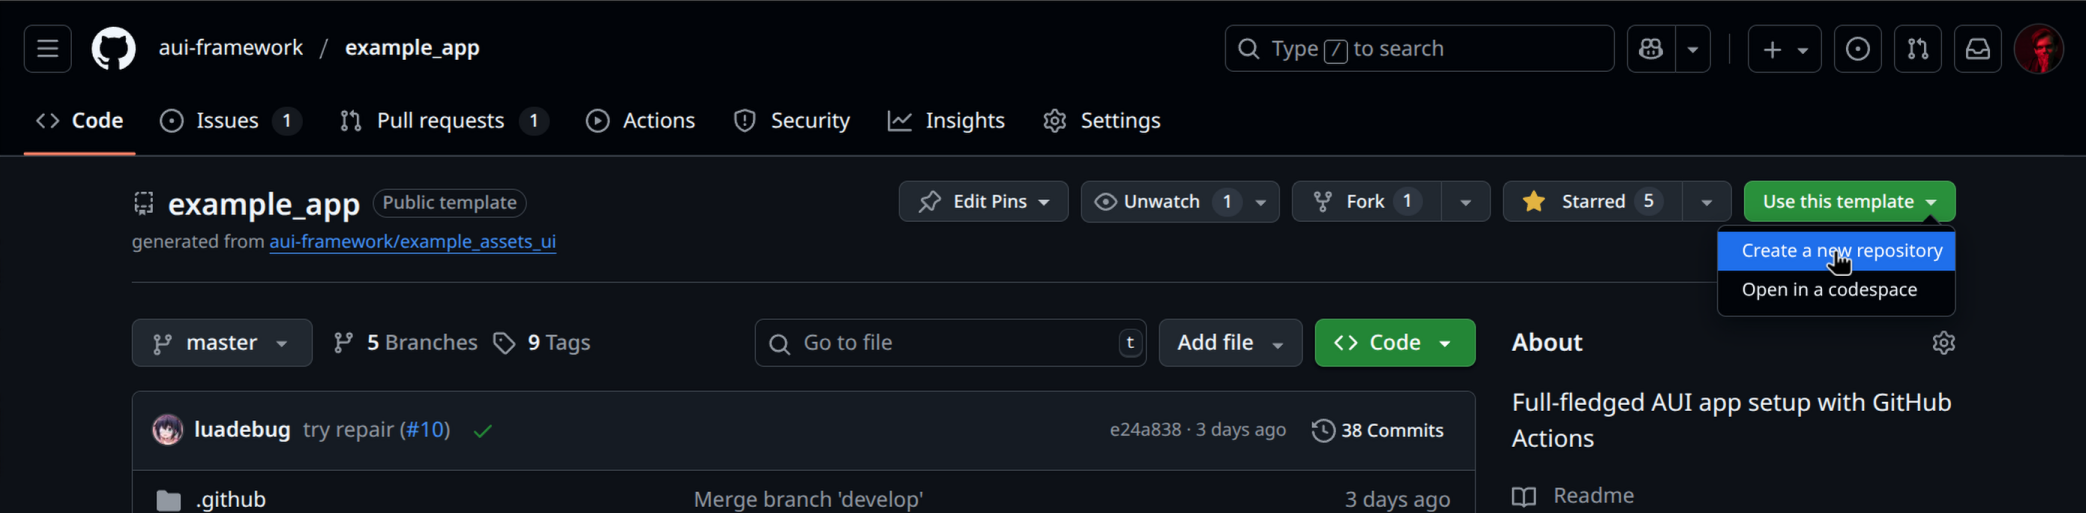
- Clone your own repo into IDE.
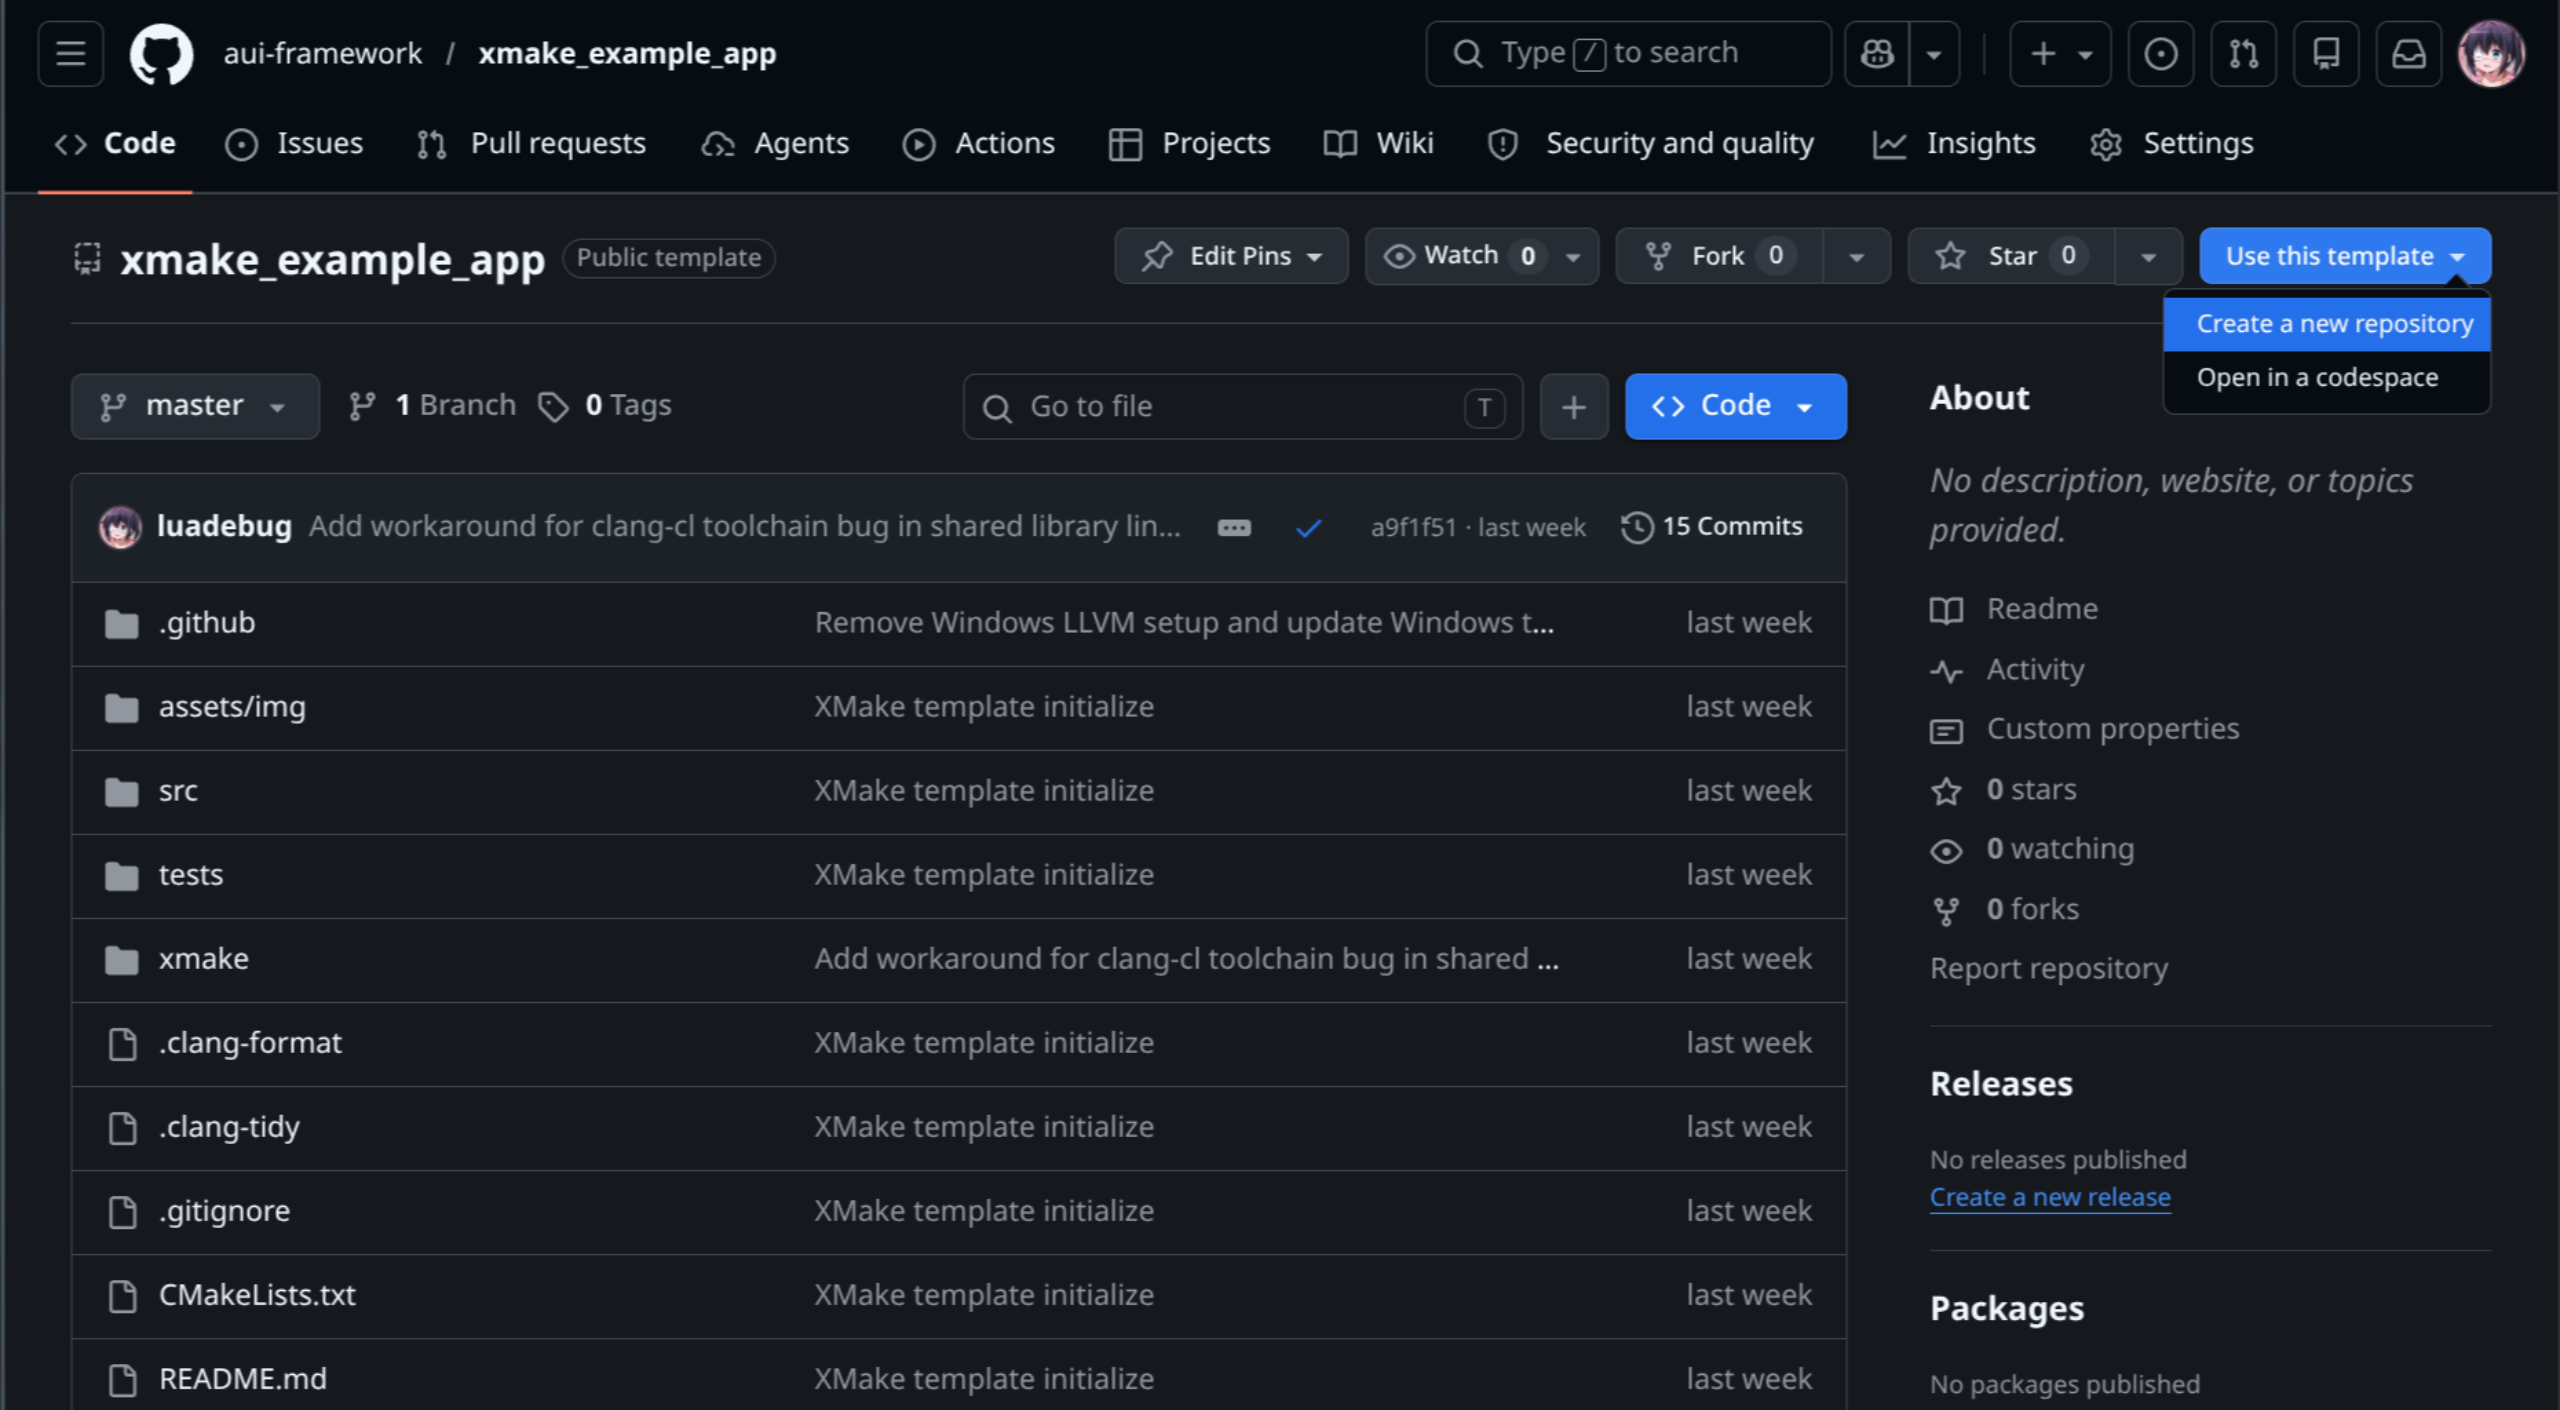
A full-fledged XMake-based app template is available at
github.com/aui-framework/xmake_example_app.
It comes pre-configured with GitHub Actions CI/CD, .clang-format, .clang-tidy, Valgrind suppression,
auto-updating (Windows), and a ready-to-run AUI window — everything you need to start shipping an app.
AUI version support
The XMake app template currently targets AUI v7.1.2. Newer versions of AUI (v8.x and above) are not yet supported. Track progress in the xmake_example_app repository.
Recommended: Create a new repo from the template
- Open https://github.com/aui-framework/xmake_example_app
-
Click
Use this template→Create a new repository. -
Clone your new repo and open it in your IDE.
The template includes the following GitHub Actions workflows:
- Build — triggered on
pushandpull_request. Builds for all supported platforms, runs tests, generates installable packages, and prepares a GitHub Release draft. - Code Quality — triggered on
pull_request. Runsclang-tidystatic analysis andvalgrinddynamic analysis on tests.
To create a release, bump the version in CMakeLists.txt and push — the pipeline creates a GitHub Release
draft for you automatically.
AUI provides support to several package managers, to choose at your own.
aui.boot is *official* way of using AUI. It is a CMake-based package manager that requires nothing but CMake.
Download AUI.Boot (one-time):
curl https://raw.githubusercontent.com/aui-framework/aui/refs/heads/master/aui.boot.cmake -o aui.boot.cmake
Create CMakeLists.txt:
# Standard routine
cmake_minimum_required(VERSION 3.16)
project(project_template)

# Use AUI.Boot
include(aui.boot.cmake)

# import AUI
auib_import(
    aui https://github.com/aui-framework/aui
    COMPONENTS core views
    VERSION v8.0.0-rc.8
    )


# Create the executable. This function automatically links all sources from the src/ folder, creates CMake target and
# places the resulting executable to bin/ folder.
aui_executable(project_template)

# Link required libs
aui_link(project_template PRIVATE aui::core aui::views)
CMake's missing package manager is a small CMake script for setup-free, cross-platform, reproducible dependency management.
Download CPM to your project directory:
mkdir -p cmake
wget -O cmake/CPM.cmake https://github.com/cpm-cmake/CPM.cmake/releases/latest/download/get_cpm.cmake
Then, create a CMakeLists.txt:
# Standard routine
cmake_minimum_required(VERSION 3.16)
project(project_template)

# import AUI
include(cmake/CPM.cmake)
CPMAddPackage("gh:aui-framework/aui#v7.1.2")

# Create the executable. This function automatically links all sources from the src/ folder, creates CMake target and
# places the resulting executable to bin/ folder.
aui_executable(project_template)

# Link required libs
aui_link(project_template PRIVATE aui::core aui::views)
XMake is a lightweight, cross-platform build utility with built-in package management. It requires no external package manager — AUI is fetched and compiled automatically from xmake-repo.
AUI version support
XMake package support currently targets AUI v7.1.2. Newer versions (v8.x and above) are not yet available in xmake-repo. If you need the latest AUI, use AUI Boot or CPM instead.
Install XMake
Install via winget (recommended):
Or download the installer from xmake.io and run it.
Note
After installation, reopen your terminal so that xmake is available on the PATH.
Install via Homebrew:
curl -fsSL https://xmake.io/shget.text | bash
Or install via apt (may be an older version):
sudo add-apt-repository ppa:xmake-io/xmake
sudo apt update
sudo apt install xmake
curl -fsSL https://xmake.io/shget.text | bash
Verify the installation:
Create xmake.lua
Create the following xmake.lua in your project root:
-- Specify available build configurations
add_rules("mode.release", "mode.debug")

-- Output compile_commands.json for clangd / VS Code IntelliSense
add_rules("plugin.compile_commands.autoupdate", {outputdir = ".vscode", lsp = "clangd"})

-- AUI requires C++20
set_languages("c++20")

-- Fetch AUI v7.1.2 from xmake-repo (latest version supported via XMake)
add_requires("aui v7.1.2")

-- Define the executable target
target("project_template")
    -- Collect all .cpp files from the src/ directory
    add_files("src/*.cpp")
    add_includedirs("src")
    -- Link AUI with only the components you need
    add_packages("aui", {components = {"core", "image", "views", "xml"}})
    -- Group AUI components into link groups to resolve circular dependencies
    add_linkgroups("aui.views", "aui.xml", "aui.image", "aui.core", {whole = true})
Create src/ directory and entry point
XMake picks up all .cpp files from src/ automatically. Create at minimum:
Build and run
On the first run, XMake will download and compile AUI and all its dependencies. This may take a few minutes. Subsequent builds are incremental and fast.
Switching between Debug and Release
VS Code integration
The plugin.compile_commands.autoupdate rule in xmake.lua automatically generates
.vscode/compile_commands.json on every build. This enables full IntelliSense and
code navigation in VS Code via the vscode-clangd extension — no additional configuration needed.
See Minimal UI Template XMake for a full ready-to-use example with
MainWindow.
aui_executable hooks all CPP files from src/ directory. You need to create src/ directory and a CPP file in
it.
| src/main.cpp | |
|---|---|
| |
Why CMake or IDE doesn't recognize a new CPP file?
This indicates that the IDE's build system needs to be initialized or refreshed.
Reload CMake project to hook up a newly added CPP file:
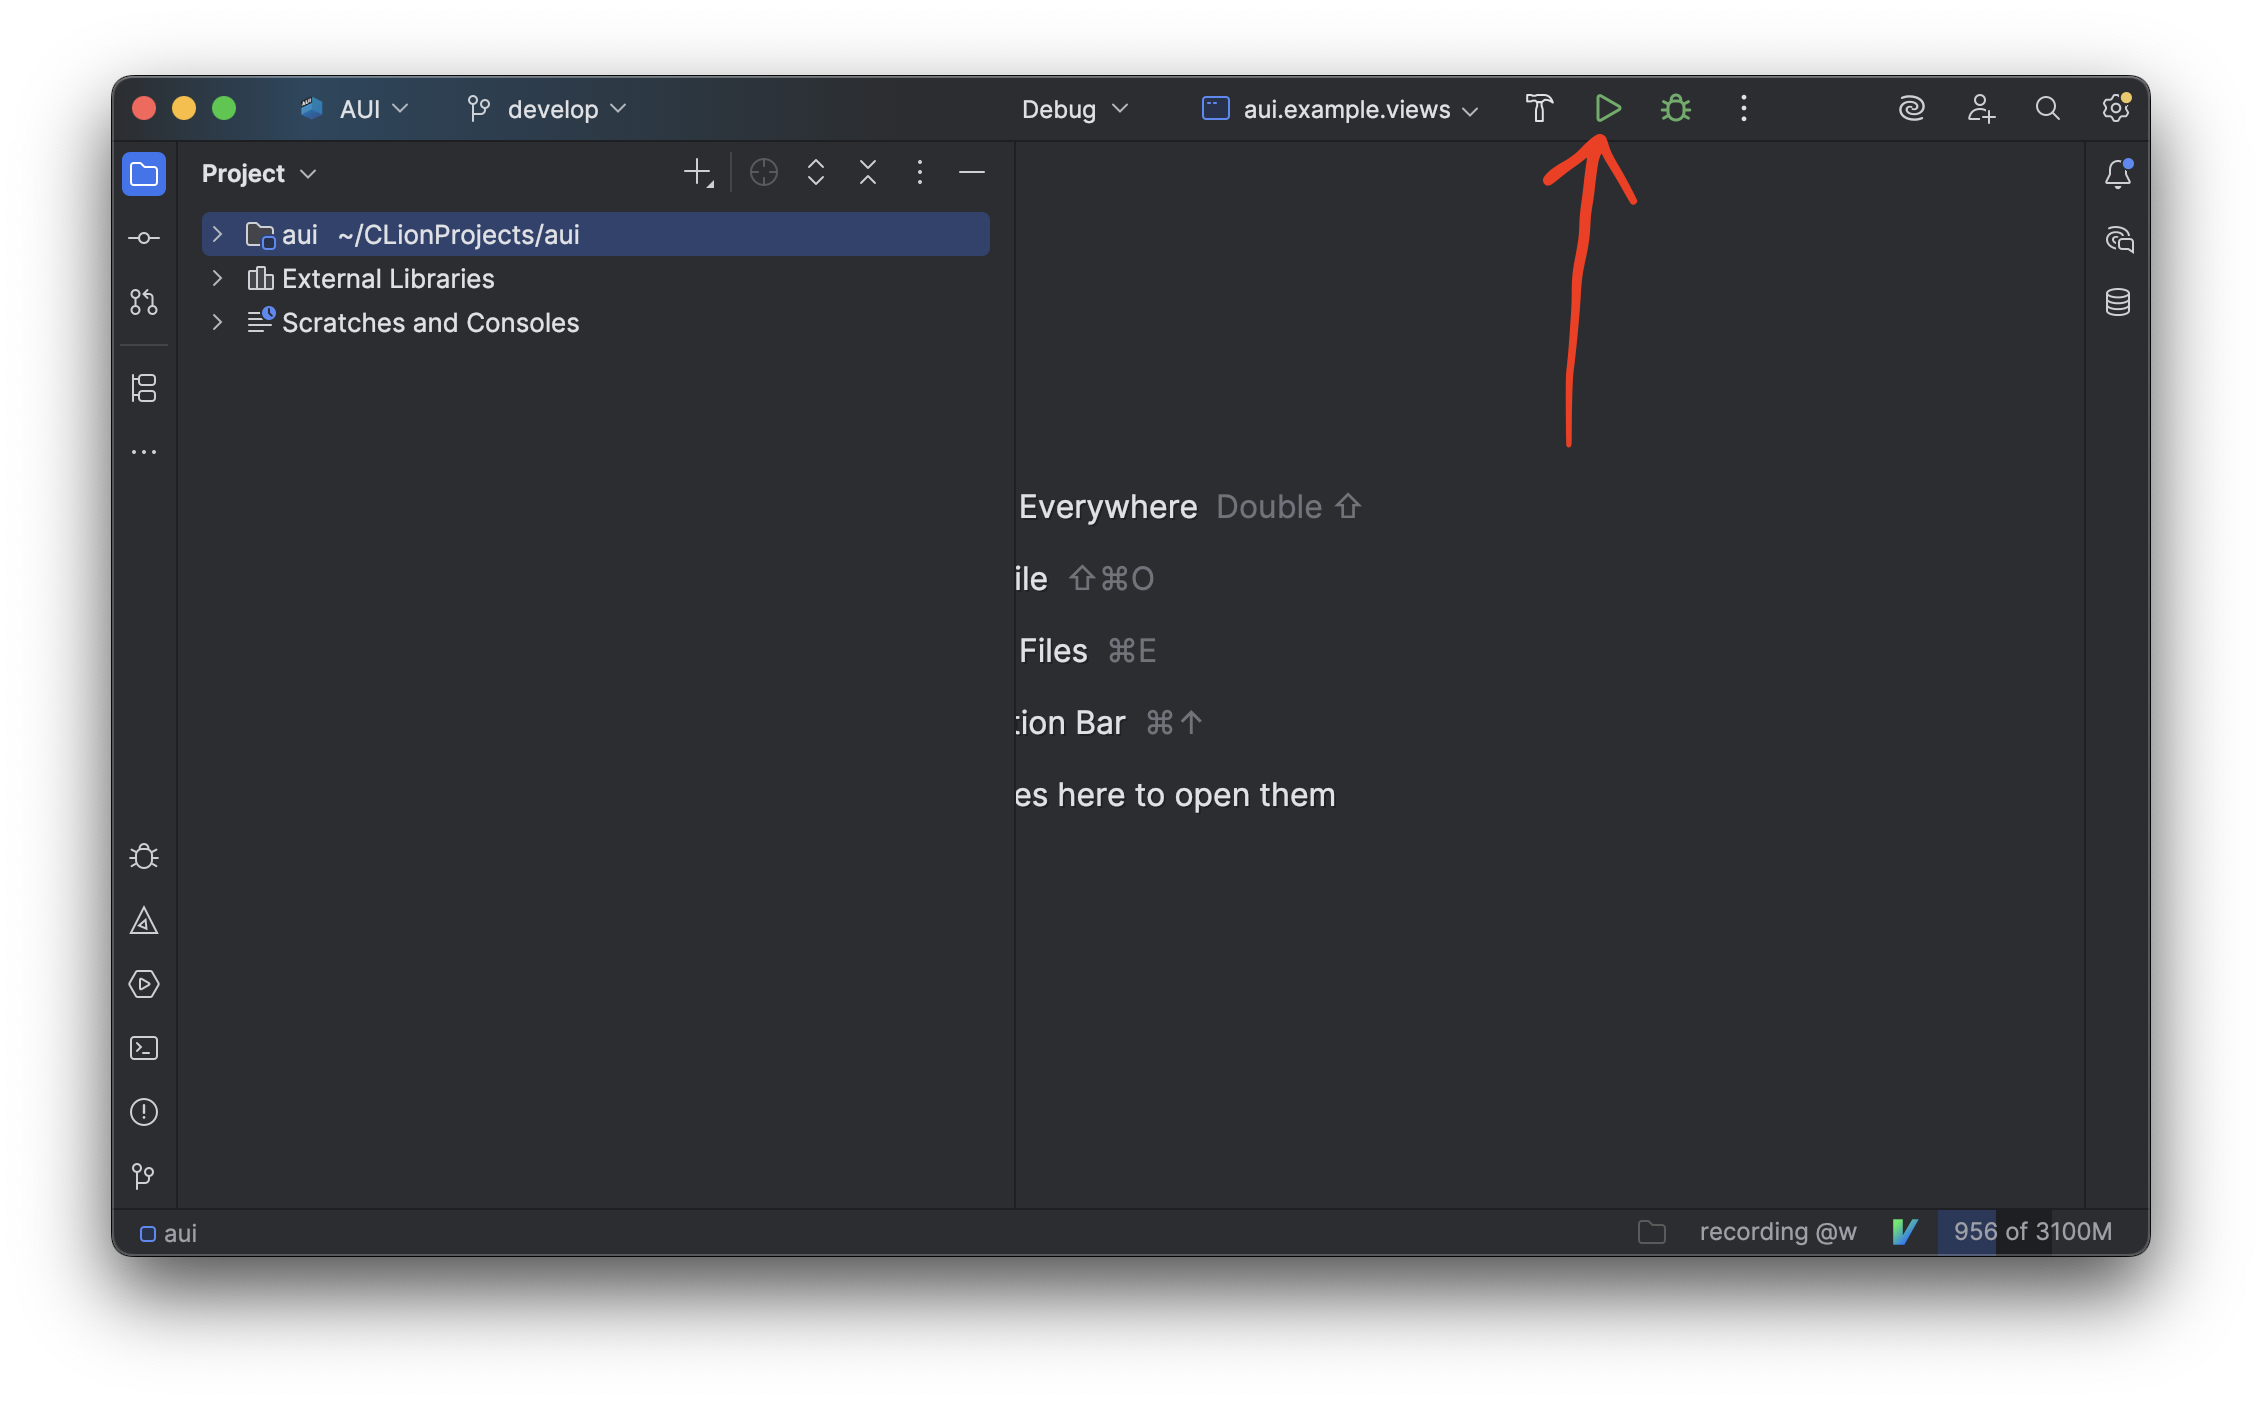
Build and Run Your App#
Run -> Run "project name" or green arrow in top right corner.
- F1
>CMake: Configure. If it asks for a toolchain, chooseUnspecified. - Choose CMake logo in the left panel (where the extensions tab live).
- Right click on project's target >
Set Build targetandSet Launch/Debug target.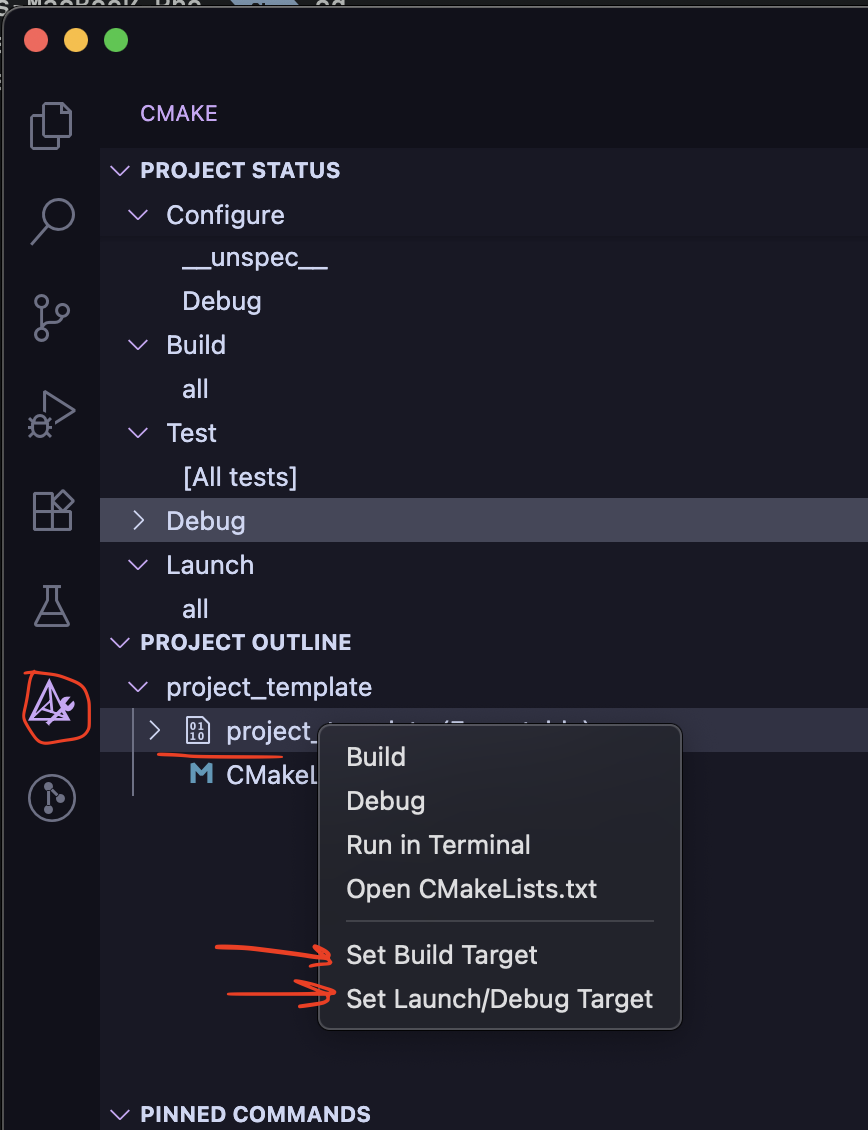
- F1
>CMake: Debug.
See layout managers for more info about layout managers.
See ASS for more info about styling.
See Examples for examples.